How To Add Advertisements To Facebook Instant Articles
In this article, you will learn about making money from Instant Articles. This is an important step for everyone who has enabled Instant Articles & wants to make money from their blog.
By default, Instant Articles doesn’t show any ads & you will not be earning any money.
In this guide, I will talk about enabling Facebook Audience Network ads to Instant Articles. Think of Audience Network ads as “AdSense for Facebook“, but the difference here is:
- The fill rate & CPM is pretty high in comparison to other ad networks.
- The ads shown on your Instant Articles pages will be targeted based on user demographics & interest.
Here is what Facebook has to say about Audience Network ads:
Audience Network provides publishers and developers with engaging, high performing ad units backed by Facebook’s 3 million advertisers. Audience Network extends the reach of Facebook campaigns beyond Facebook, and provides publishers a way to monetize their content with relevant, better-targeted ads and innovative native ad formats.
Step-by-step guide to enable Audience Network ads:
Go to your Facebook page Instant Articles settings & under tools, look for Audience Network.
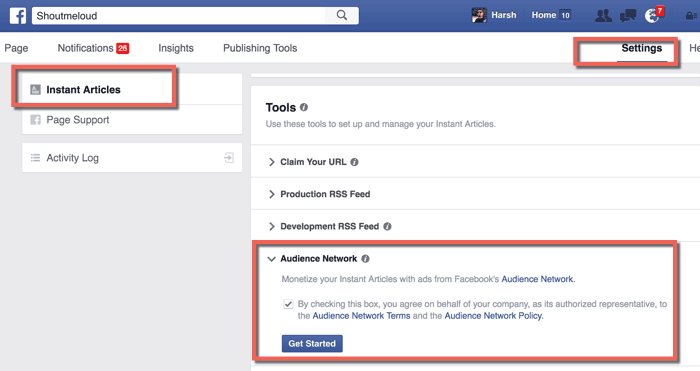
Check the box & click on “Get Started”. This should bring up a screen like this:
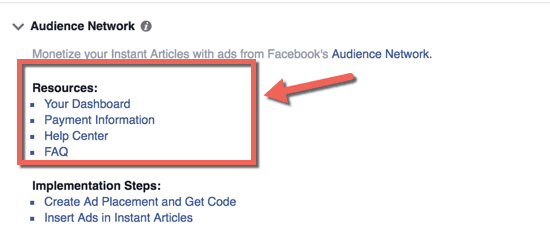
Click on “Your Dashboard”. Here we will create the ad placement. Click on the “Placements” tab & that should bring up a screen like this:
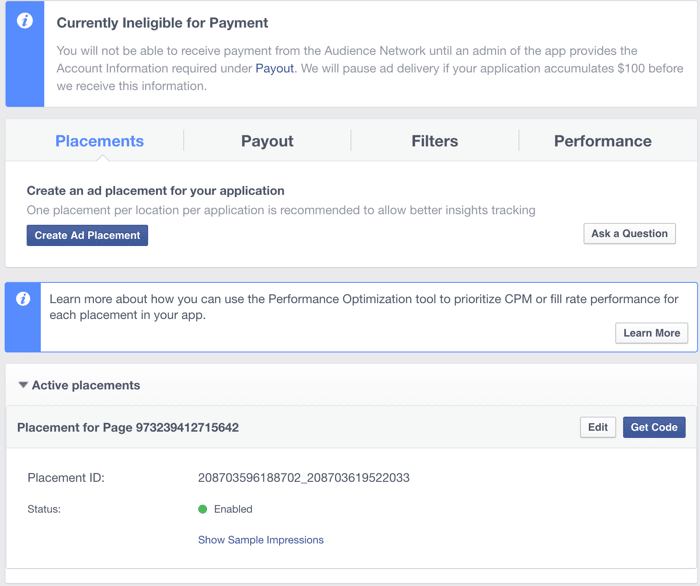
Click on “Create Ad Placement” & give it a meaningful name. It’s important to provide a meaningful name as it will help us to track reporting by unique ad locations in Instant Articles.
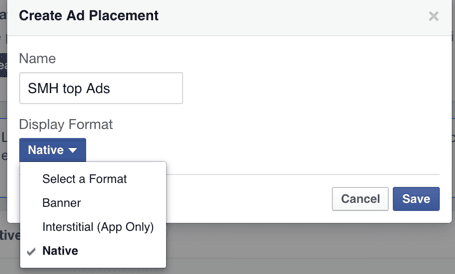
You have the option to select from 3 different ad types:
- Banner
- Interstitial (app only)
- Native
In-stream video ad options will be added in the coming days.
For now, select the “Banner” ad format & click on save. Now, you should be able to see the ad placement ID. You can also click on “Get Code” to access the Javascript code for implementing ads.

Since we are using the official Facebook Instant Articles plugin, we just need the Placement ID to get started.
Login to your WordPress dashboard & go into the Instant Articles settings.
Look for the “Ads” section.
- Select Ad type: Facebook Audience Network
- Copy the Audience Network Placement ID
- Select the ad dimensions
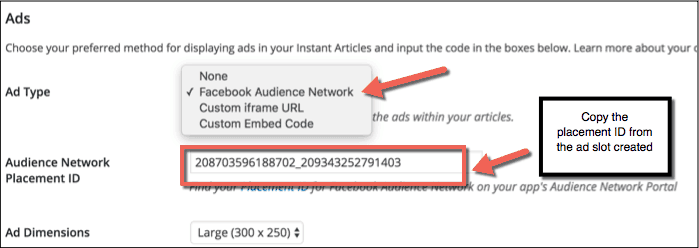
Click on “Save” & that’s it!
Getting paid by Facebook Audience Network:
With the above steps, we have configured ads on Instant Articles. Now, it’s time to fill out the payment information so that we can get paid.
On the Facebook Audience Network dashboard, click on “Payout” & you will see a screen like this:
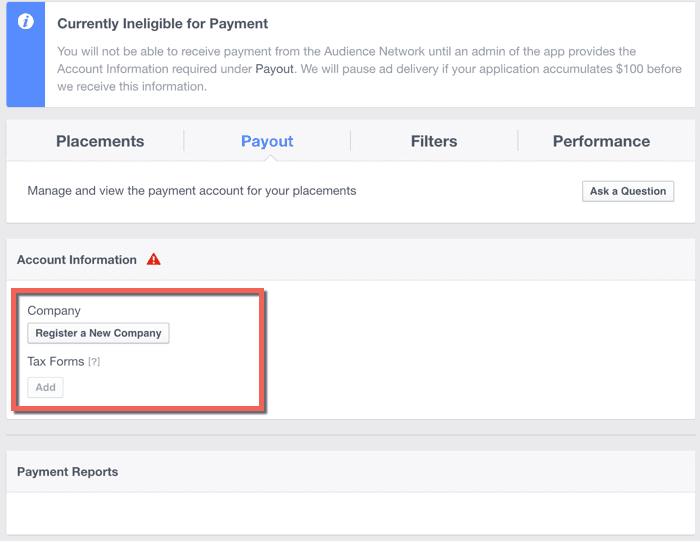
Create a new company:
Click on “Create a New Company” & start filling out the form.
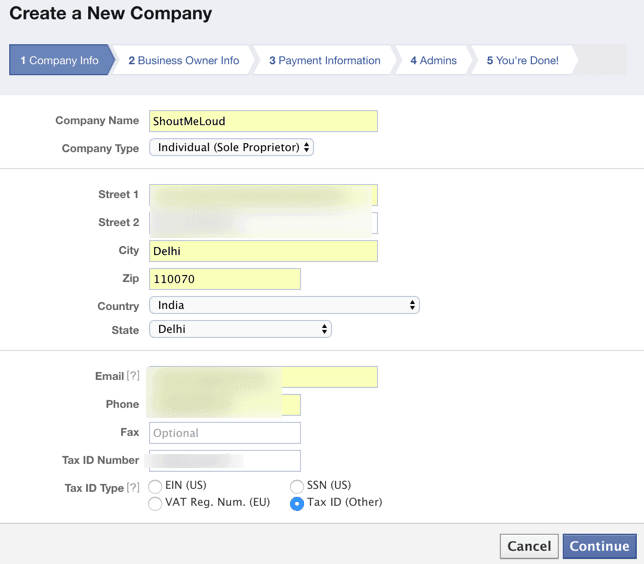
Currently, Facebook pays its publishers in two ways:
- PayPal
- Direct bank deposit
You can use either one of them. I prefer using direct bank deposit because with PayPal, I will lose out on a considerable amount of money due to currency conversions.
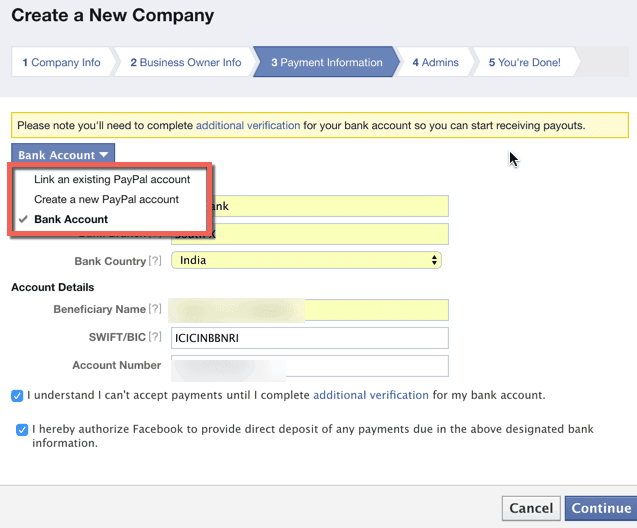
If you are from India & using direct bank deposit, you can use this guide to configure your payout information. (It’s the same as direct bank deposit offered by Google AdSense.)
Note: When I selected “Link an existing PayPal account” for payout, it showed me this warning:
“Please note you’ll need to complete additional verification for your bank account so you can start receiving payouts.”
I’m not sure what this “additional verification” is for. If you select PayPal & complete the additional verification, let us know the steps in the comment section below.
Complete the remaining two steps & this will finish the process of creating a company.
The next step is to add Tax forms.
Tax forms:
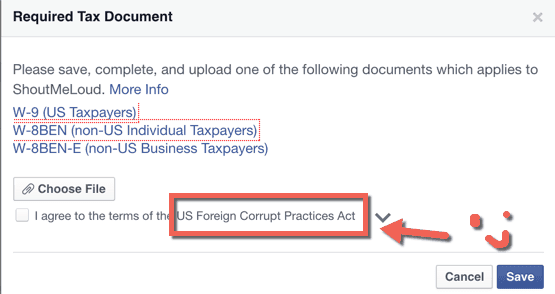
Those who are in affiliate marketing or are getting paid from an ad network in a different country might be accustomed to filling out these tax forms. (US Foreign Corrupt Practices ACT – Seriously?)
Anyways, right click on the form you are entitled to & save it onto your desktop.
Tip: Bloggers outside the U.S. who have not formed a company or are working as a part-time blogger should select W-8BEN (non-US Individual Taxpayers).
Open the downloaded .pdf file & fill out the form. This should not take more than 2 minutes. Once you have filled out the form, upload this “Required Tax Document” & click on “Save”.
Note: After clicking save, you might need to select the company’s name from a drop down menu & click on “Save Changes” to associate updated tax forms with the company.
This is how the final screen should look:
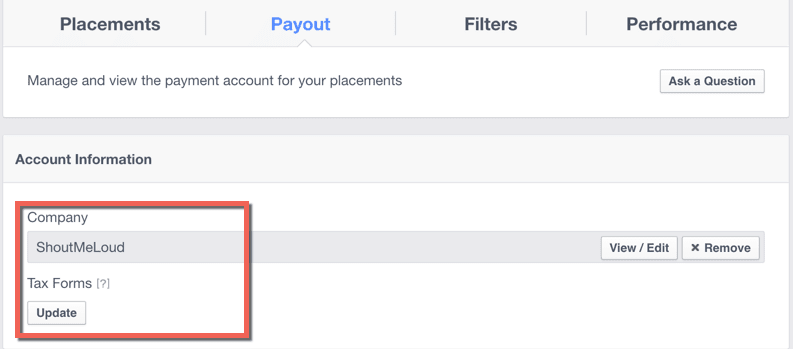
Note: You can always change your information if required. But do know that Facebook will hold your payout for 10 days if you update your payment information. Your earnings will be paid out after the holding peried
HEY GUYS TELL ME HOW IS THIS POST ,ITS REALLY HELP FULL FOR YOU?
IF YES THEN COMMENT AND TELL ME AND ALSO TELL ME YOU OPINION
IF YOU HAVE ANY PROBLEM ABOUT THIS TOPIC THEN CONTACT ME FILL FREE
AND FOLLOW ME ON SOCIAL MEDIA


No comments:
Post a Comment
Thanks keep touch with us